
 Tutorials Tutorials | (back to the list of tutorials) |
 Position and Direction of Agent
The basic structure of this type of agent is described in the following code. The class definition includes two instance field of IVec, pos and dir and each represents the position of the agent in the 3D space and the direction of the agent to generate the next child agent.
![]()
![]()
![]()
![]()
import processing.opengl.*;
import igeo.*;

void setup(){
  size(480, 360, IG.GL);
  MyAgent agent = new MyAgent(IG.v(0,0,0), IG.v(1,0,0));
}

class MyAgent extends IAgent{
  IVec pos, dir;

  MyAgent(IVec p, IVec d){
    pos = p;
    dir = d;
  }

  void update(){
    IVec pos2 = pos.cp(dir);
    IVec dir2 = dir.cp();
    new MyAgent(pos2,dir2);
    del();
  }
}
The code above doesn't show anything when you run the code because it doesn't include any methods to create geometries.
In the setup() method, an instance of MyAgent is
created taking two ninput vectors. The first input vector
is passed to the position vector and the second is to the
direction vector in the constructor of MyAgent class.
In the update() method, the direction vector dir
is added to the position vector pos.
However, this code uses cp() method like
pos.cp(dir), which copies the instance and add the
input value,
instead of add() method like
pos.add(dir) because not to change the content of
pos in case it's used to create geometries
or checked by other agents later.
Because of this reason, the moved position with the direction
vector is assigned to the new instance of IVec pos2.
In the same way, the direction vector dir is copied
to dir2 in case dir is used later
(if you pass dir directly to the child agent and
the child agent change dir inside the child,
dir in the parent is also changed).
Then these new position pos2 and new direction
dir2 are used to create a new child agent at this line.
new MyAgent(pos2,dir.cp());
At the end of update()
the agent is deleted with del() method because
this agent is designed just to
generate one child and stop.
The following code generates points at the position of each agent. It also limit the duration of execution for 50 times.
![]()
![]()
![]()
![]()
import processing.opengl.*;
import igeo.*;

void setup(){
  size(480, 360, IG.GL);
  IG.duration(50);
  MyAgent agent = new MyAgent(IG.v(0,0,0), IG.v(1,0,0));
}

class MyAgent extends IAgent{
  IVec pos, dir;

  MyAgent(IVec p, IVec d){
    pos = p;
    dir = d;
  }

  void update(){
    IVec pos2 = pos.cp(dir);
    IVec dir2 = dir.cp();
    new IPoint(pos);
    new MyAgent(pos2,dir2);
    del();
  }
}
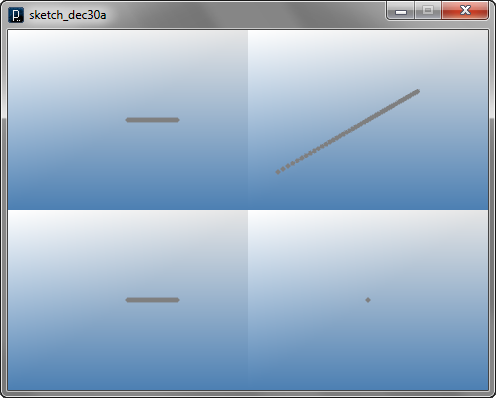
Now you can see the behavior of the agent as straight movement in x-axis direction because the direction vector is defined as (1,0,0) in the setup() method at the constructor of MyAgent and the direction vector dir is just copied to dir2 and its content is never changed.
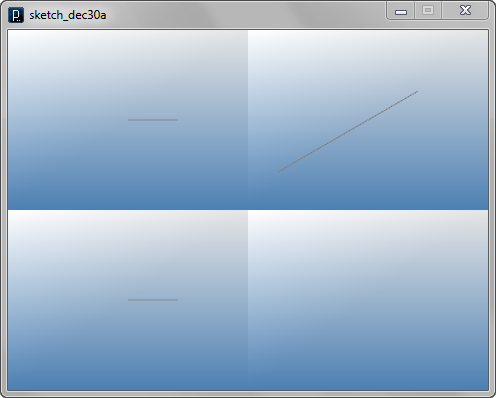
The following code generates lines instead of points between the position of the agent and another position of the next agent.
![]()
![]()
![]()
![]()
import processing.opengl.*;
import igeo.*;

void setup(){
  size(480, 360, IG.GL);
  IG.duration(50);
  MyAgent agent = new MyAgent(IG.v(0,0,0), IG.v(1,0,0));
}

class MyAgent extends IAgent{
  IVec pos, dir;

  MyAgent(IVec p, IVec d){
    pos = p;
    dir = d;
  }

  void update(){
    IVec pos2 = pos.cp(dir);
    IVec dir2 = dir.cp();
    new ICurve(pos,pos2);
    new MyAgent(pos2,dir2);
    del();
  }
}
Transforming Direction 1![]()
![]()
![]()
![]()
import processing.opengl.*;
import igeo.*;

void setup(){
  size(480, 360, IG.GL);
  IG.duration(50);
  MyAgent agent = new MyAgent(IG.v(0,0,0), IG.v(1,0,0));
}

class MyAgent extends IAgent{
  IVec pos, dir;

  MyAgent(IVec p, IVec d){
    pos = p;
    dir = d;
  }

  void update(){
    IVec pos2 = pos.cp(dir);
    IVec dir2 = dir.cp();
    dir2.add(0,0.1,0);
    new ICurve(pos,pos2).clr(0);
    new MyAgent(pos2,dir2);
    del();
  }
}
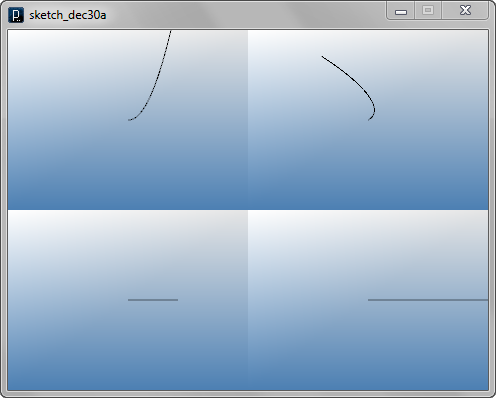
The next code is adding a negative value in x-axis as well as adding a positive value in y-axis.
![]()
![]()
![]()
![]()
import processing.opengl.*;
import igeo.*;

void setup(){
  size(480, 360, IG.GL);
  IG.duration(50);
  MyAgent agent = new MyAgent(IG.v(0,0,0), IG.v(1,0,0));
}

class MyAgent extends IAgent{
  IVec pos, dir;

  MyAgent(IVec p, IVec d){
    pos = p;
    dir = d;
  }

  void update(){
    IVec pos2 = pos.cp(dir);
    IVec dir2 = dir.cp();
    dir2.add(-0.1,0.1,0);
    new ICurve(pos,pos2).clr(0);
    new MyAgent(pos2,dir2);
    del();
  }
}

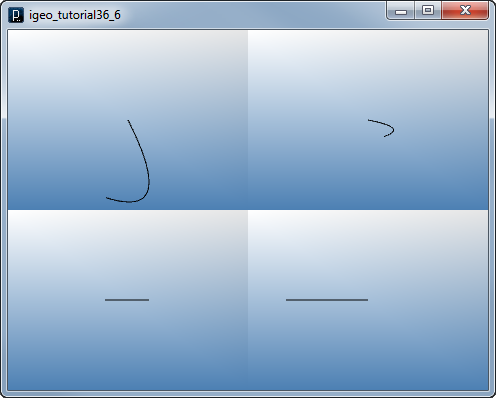
The next code has the same transformation of addition as the previous code but the initial direction vector is different. The initial direction is (2, -4, 0), instead of (1, 0, 0). An initial condition is also important factor to define the behavior of agents as well as an update transformation rule.
![]()
![]()
![]()
![]()
import processing.opengl.*;
import igeo.*;

void setup(){
  size(480, 360, IG.GL);
  IG.duration(50);
  MyAgent agent = new MyAgent(IG.v(0,0,0), IG.v(2,-4,0));
}

class MyAgent extends IAgent{
  IVec pos, dir;

  MyAgent(IVec p, IVec d){
    pos = p;
    dir = d;
  }

  void update(){
    IVec pos2 = pos.cp(dir);
    IVec dir2 = dir.cp();
    dir2.add(-0.1,0.1,0);
    new ICurve(pos,pos2).clr(0);
    new MyAgent(pos2,dir2);
    del();
  }
}
Transforming Direction 2![]()
![]()
![]()
![]()
import processing.opengl.*;
import igeo.*;

void setup(){
  size(480, 360, IG.GL);
  IG.duration(200);
  MyAgent agent = new MyAgent(IG.v(0,0,0), IG.v(1,0,0));
}

class MyAgent extends IAgent{
  IVec pos, dir;

  MyAgent(IVec p, IVec d){
    pos = p;
    dir = d;
  }

  void update(){
    IVec pos2 = pos.cp(dir);
    IVec dir2 = dir.cp();
    dir2.rot(IG.zaxis, PI/100);
    new ICurve(pos,pos2).clr(0);
    new MyAgent(pos2,dir2);
    del();
  }
}

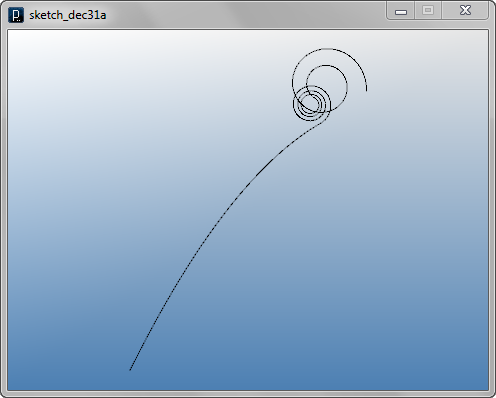
Another example below combines rotation and multiplication (scaling) of a vector. It rotates and slightly shrinks the vector by 0.999. As a result, it forms swirling curve.
![]()
![]()
![]()
![]()
import processing.opengl.*;
import igeo.*;

void setup(){
  size(480, 360, IG.GL);
  IG.duration(1000);
  MyAgent agent = new MyAgent(IG.v(0,0,0), IG.v(1,0,0));
}

class MyAgent extends IAgent{
  IVec pos, dir;

  MyAgent(IVec p, IVec d){
    pos = p;
    dir = d;
  }

  void update(){
    IVec pos2 = pos.cp(dir);
    IVec dir2 = dir.cp();
    dir2.rot(IG.zaxis, PI/100);
    dir2.mul(0.999);
    new ICurve(pos,pos2).clr(0);
    new MyAgent(pos2,dir2);
    del();
  }
}

The example below changes the angle to rotate and the multiplier (scaling factor) to multiply the direction vector. Because the rotation vector is large and not clear number, it forms totally different geometry from the swirling curve in the previous example.
![]()
![]()
![]()
![]()
import processing.opengl.*;
import igeo.*;

void setup(){
  size(480, 360, IG.GL);
  IG.duration(100);
  MyAgent agent = new MyAgent(IG.v(0,0,0), IG.v(100,0,0));
}

class MyAgent extends IAgent{
  IVec pos, dir;

  MyAgent(IVec p, IVec d){
    pos = p;
    dir = d;
  }

  void update(){
    IVec pos2 = pos.cp(dir);
    IVec dir2 = dir.cp();
    dir2.rot(IG.zaxis, PI*0.89);
    dir2.mul(1.01);
    new ICurve(pos,pos2).clr(0);
    new MyAgent(pos2,dir2);
    del();
  }
}
Conditional Transformation 1The first one below changes the rotation angle and scaling factor depending on the x component of the direction.
![]()
![]()
![]()
![]()
import processing.opengl.*;
import igeo.*;

void setup(){
  size(480, 360, IG.GL);
  IG.duration(500);
  MyAgent agent = new MyAgent(IG.v(0,0,0), IG.v(1,0,0));
}

class MyAgent extends IAgent{
  IVec pos, dir;

  MyAgent(IVec p, IVec d){
    pos = p;
    dir = d;
  }

  void update(){
    IVec pos2 = pos.cp(dir);
    IVec dir2 = dir.cp();
    if(dir2.x() > 0){
      dir2.rot(IG.zaxis, PI/80);
      dir2.mul(0.999);
    }
    else{
      dir2.rot(IG.zaxis, PI/40);
      dir2.mul(1.01);
    }
    new ICurve(pos,pos2).clr(0);
    new MyAgent(pos2,dir2);
    del();
  }
}

The example below has 4 if-conditions to switch the cases either when the x-direction is positive or negative or the y-direction is positive or negative, and then it sets the new direction in each case.
![]()
![]()
![]()
![]()
import processing.opengl.*;
import igeo.*;

void setup(){
  size(480, 360, IG.GL);
  IG.duration(100);
  MyAgent agent = new MyAgent(IG.v(0,0,0), IG.v(1,0,0));
}

class MyAgent extends IAgent{
  IVec pos, dir;

  MyAgent(IVec p, IVec d){
    pos = p;
    dir = d;
  }

  void update(){
    IVec pos2 = pos.cp(dir);
    IVec dir2 = dir.cp();
    if(dir2.x() > 0 ){
      dir2.set( 0, dir2.x(), 0);
    }
    else if(dir2.y() > 0){
      dir2.set( -dir2.y()-1, 0, 0);
    }
    else if(dir2.x() < 0){
      dir2.set( 0, dir2.x(), 0);
    }
    else if(dir2.y() < 0){
      dir2.set( -dir2.y()+1, 0, 0);
    }
    new ICurve(pos,pos2).clr(0);
    new MyAgent(pos2,dir2);
    del();
  }
}
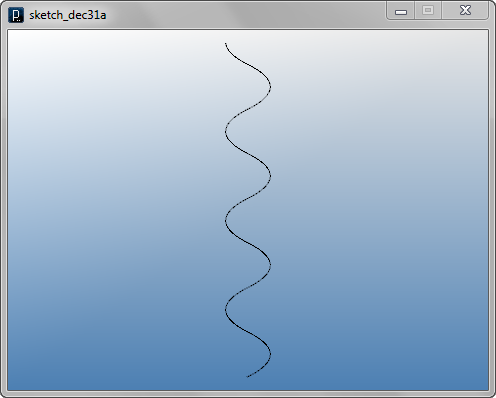
The example below has if-condition to check x component of the position, instead of the direction. Because when x position is positive, the direction is pushed to negative in x, and otherwise positive in x, as result it oscillates around x=0.
![]()
![]()
![]()
![]()
import processing.opengl.*;
import igeo.*;

void setup(){
  size(480, 360, IG.GL);
  IG.duration(500);
  MyAgent agent = new MyAgent(IG.v(0,0,0), IG.v(2,1,0));
}

class MyAgent extends IAgent{
  IVec pos, dir;

  MyAgent(IVec p, IVec d){
    pos = p;
    dir = d;
  }

  void update(){
    IVec pos2 = pos.cp(dir);
    IVec dir2 = dir.cp();
    if(pos2.x() > 0){
      dir2.add(-0.1, 0, 0);
    }
    else{
      dir2.add(0.1, 0, 0);
    }
    new ICurve(pos,pos2).clr(0);
    new MyAgent(pos2,dir2);
    del();
  }
}
Conditional Transformation 2
The example below switches three transformation rules by
the time of 0 - 99, 100 - 199, 200 - with the following
if-condition statements.
if( IG.time() < 100 ){ ... }
else if( IG.time() < 200 ){ ... }
else{ ... }
![]()
![]()
![]()
![]()
import processing.opengl.*;
import igeo.*;

void setup(){
  size(480, 360, IG.GL);
  IG.duration(250);
  MyAgent agent = new MyAgent(IG.v(0,0,0), IG.v(0,2,0));
}

class MyAgent extends IAgent{
  IVec pos, dir;

  MyAgent(IVec p, IVec d){
    pos = p;
    dir = d;
  }

  void update(){
    IVec pos2 = pos.cp(dir);
    IVec dir2 = dir.cp();
    if(IG.time() < 100){
      dir2.rot(IG.zaxis, PI/30);
      dir2.mul(0.99);
    }
    else if(IG.time() < 200){
      dir2.rot(IG.zaxis, -PI/15);
      dir2.mul(1.01);
    }
    else{
      dir2.add(0, -0.05, 0);
    }
    new ICurve(pos,pos2).clr(0);
    new MyAgent(pos2,dir2);
    del();
  }
}
This example below uses remainder operation '%' to the
time to define periodical behavior.
In the following if condition, the first if-condition part is
executed every 15 time frame and other time the second part
is executed.
if( IG.time() % 15 == 0){ ... }
else{ ... }
![]()
![]()
![]()
![]()
import processing.opengl.*;
import igeo.*;

void setup(){
  size(480, 360, IG.GL);
  IG.duration(800);
  MyAgent agent = new MyAgent(IG.v(0,0,0), IG.v(1,0,0));
}

class MyAgent extends IAgent{
  IVec pos, dir;

  MyAgent(IVec p, IVec d){
    pos = p;
    dir = d;
  }

  void update(){
    IVec pos2 = pos.cp(dir);
    IVec dir2 = dir.cp();
    if(IG.time()%15==0){
      dir2.flip();
      dir2.mul(1.01);
    }
    else{
      dir2.rot(IG.zaxis, PI/25);
    }
    new ICurve(pos,pos2).clr(0);
    new MyAgent(pos2,dir2);
    del();
  }
}
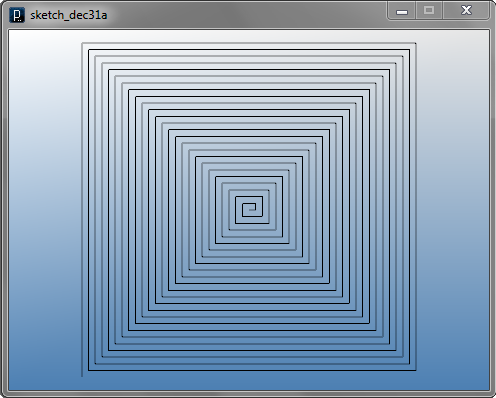
The following code has more if-condition statements
to define more combinational behavior.
To define periodical behavior with differentiation in time,
it uses a remainder operation '%' and
range definition with an inequality operator '<'
as well as an equality operator '=='.
if( IG.time()%50 < 10 ){ ... }
else if( IG.time()%50 == 10 ){ ... }
else if( IG.time()%50 < 30 ){ ... }
else if( IG.time()%50 < 40 ){ ... }
else if( IG.time()%50 == 40 ){ ... }
else{ ... }
![]()
![]()
![]()
![]()
import processing.opengl.*;
import igeo.*;

void setup(){
  size(480, 360, IG.GL);
  IG.duration(800);
  MyAgent agent = new MyAgent(IG.v(0,0,0), IG.v(1,0,0));
}

class MyAgent extends IAgent{
  IVec pos, dir;

  MyAgent(IVec p, IVec d){
    pos = p;
    dir = d;
  }

  void update(){
    IVec pos2 = pos.cp(dir);
    IVec dir2 = dir.cp();
    if(IG.time()%50 < 10){
      dir2.rot(IG.zaxis, PI/20);
    }
    else if(IG.time()%50 == 10){
      dir2.flip();
    }
    else if(IG.time()%50 < 30){
      dir2.rot(IG.zaxis, PI/11);
    }
    else if(IG.time()%50 < 40){
      dir2.rot(IG.zaxis, -PI/21);
    }
    else if(IG.time()%50 == 40){
      dir2.flip();
    }
    else{
      dir2.rot(IG.zaxis, PI/15);
      dir2.mul(1.01);
    }
    new ICurve(pos,pos2).clr(0);
    new MyAgent(pos2,dir2);
    del();
  }
}
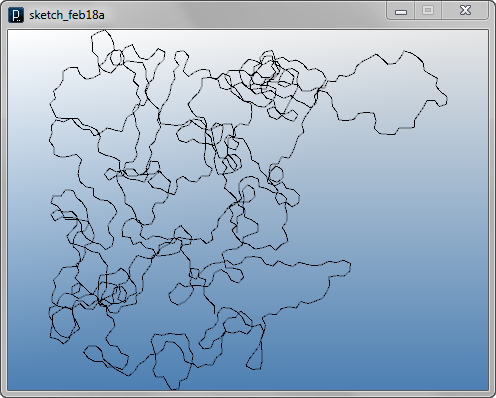
Random Transformation
The example below shows an example of random walk agent.
It rotates the direction randomly using random number method
IRand.get(-PI*0.4,PI*0.5)
Note that the minimum range and the maximum range
of the random number is not symmetrical around zero and
the average number is some positive number.
This causes the average behavior to rotate to
the positive direction.
![]()
![]()
![]()
![]()
import processing.opengl.*;
import igeo.*;

void setup(){
  size(480, 360, IG.GL);
  IG.duration(1000);
  MyAgent agent = new MyAgent(IG.v(0,0,0), IG.v(0,2,0));
}

class MyAgent extends IAgent{
  IVec pos, dir;

  MyAgent(IVec p, IVec d){
    pos = p;
    dir = d;
  }

  void update(){
    IVec pos2 = pos.cp(dir);
    IVec dir2 = dir.cp();
    dir2.rot(IG.zaxis, IRand.get(-PI*0.4, PI*0.5)); //-72deg to +90deg
    new ICurve(pos,pos2).clr(0);
    new MyAgent(pos2,dir2);
    del();
  }
}
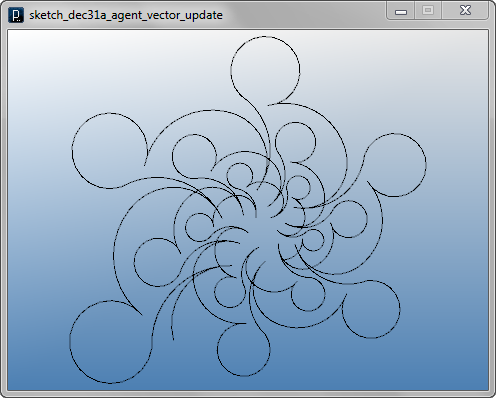
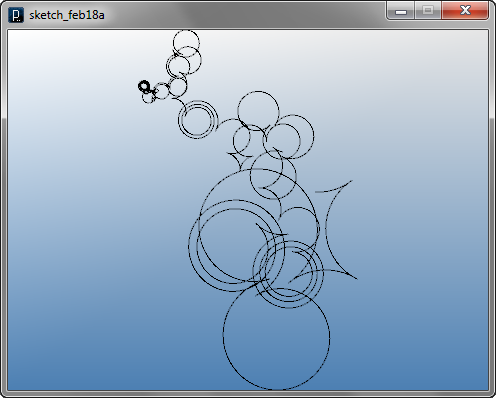
This example below is similar to the code in the previous section
"Conditional Transformation 2" but this code switches the behavior
by random percentage instead of the time interval inside the
if-condition.
The randomness method IRand.pct(2.5)
returns true in 2.5% probability or false in 97.5%.
When you combine this with if-condition,
you can switch agent's behavior randomly.
if( IRand.pct(2.5) ){ ... }
//2.5% probability
else{ ... }
//97.5% probability
![]()
![]()
![]()
![]()
import processing.opengl.*;
import igeo.*;

void setup(){
  size(480, 360, IG.GL);
  IG.duration(2000);
  MyAgent agent = new MyAgent(IG.v(0,0,0), IG.v(1,0,0));
}

class MyAgent extends IAgent{
  IVec pos, dir;

  MyAgent(IVec p, IVec d){
    pos = p;
    dir = d;
  }

  void update(){
    IVec pos2 = pos.cp(dir);
    IVec dir2 = dir.cp();
    if(IRand.pct(2.5)){ //2.5% probability
      dir2.flip();
      dir2.mul(1.1);
    }
    else{ //97.5% probability
      dir2.mul(0.996);
      dir2.rot(IG.zaxis, PI/25);
    }
    new ICurve(pos,pos2).clr(0);
    new MyAgent(pos2,dir2);
    del();
  }
}
Initialization with Multiple InstancesThis first code is adding multiple instantiation to this previous example with different initial positions on the x-axis and different initial directions towards negative y-directions.
![]()
![]()
![]()
![]()
import processing.opengl.*;
import igeo.*;

void setup(){
  size(480, 360, IG.GL);
  IG.duration(80);
  for(int i=0; i < 40; i++){
    new MyAgent(IG.v(i*5,0,0), IG.v(1-0.05*i,-0.1*i,0));
  }
}

class MyAgent extends IAgent{
  IVec pos, dir;

  MyAgent(IVec p, IVec d){
    pos = p;
    dir = d;
  }

  void update(){
    IVec pos2 = pos.cp(dir);
    IVec dir2 = dir.cp();
    dir2.add(0,0.1,0);
    new ICurve(pos,pos2).clr(0);
    new MyAgent(pos2,dir2);
    del();
  }
}

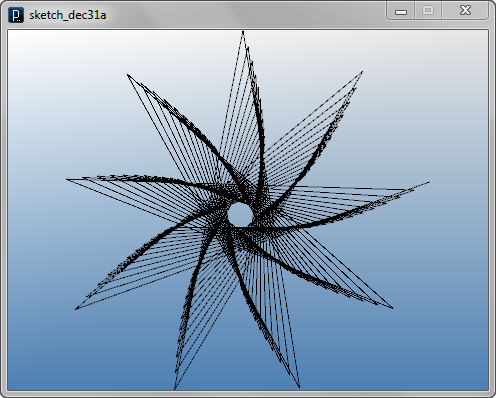
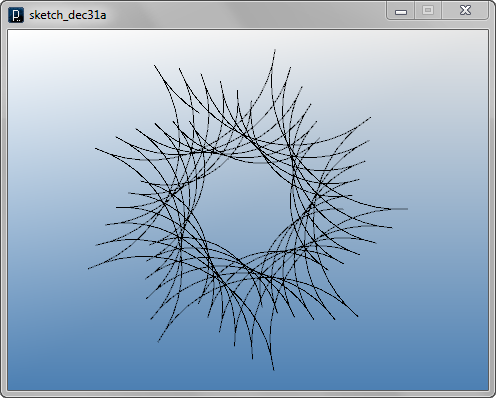
The following second code is adding multiple instantiation to another previous example with conditional transformation with radial initial positions and phase-shifted radial directions.
![]()
![]()
![]()
![]()
import processing.opengl.*;
import igeo.*;

void setup(){
  size(480, 360, IG.GL);
  IG.duration(250);
  int num = 40;
  float inc = 2*PI/num;
  for(int i=0; i < num; i++){
    new MyAgent(IG.v(40*cos(i*inc), 40*sin(i*inc), 0),
                IG.v(5*cos((i+6)*inc), sin((i+6)*inc), 0));
  }
}

class MyAgent extends IAgent{
  IVec pos, dir;

  MyAgent(IVec p, IVec d){
    pos = p;
    dir = d;
  }

  void update(){
    IVec pos2 = pos.cp(dir);
    IVec dir2 = dir.cp();
    if(pos2.x() > 0){
      dir2.add(-0.1, 0, 0);
    }
    else{
      dir2.add(0.1, 0, 0);
    }
    new ICurve(pos,pos2).clr(0);
    new MyAgent(pos2,dir2);
    del();
  }
}

HOME
FOR PROCESSING
DOWNLOAD
DOCUMENTS
TUTORIALS (Java /
Python)
GALLERY
SOURCE CODE(GitHub)
PRIVACY POLICY
ABOUT/CONTACT
