
 チュートリアル チュートリアル | (トピック一覧へ戻る) |
 エージェントの位置と方向
そのようなエージェントのクラスは、位置posと方向dirをそれぞれIVecオブジェクトとして保持するよう定義されます。
![]()
![]()
![]()
![]()
import processing.opengl.*;
import igeo.*;

void setup(){
  size(480, 360, IG.GL);
  MyAgent agent = new MyAgent(IG.v(0,0,0), IG.v(1,0,0));
}

class MyAgent extends IAgent{
  IVec pos, dir;

  MyAgent(IVec p, IVec d){
    pos = p;
    dir = d;
  }

  void update(){
    IVec pos2 = pos.cp(dir);
    IVec dir2 = dir.cp();
    new MyAgent(pos2,dir2);
    del();
  }
}
ただし、上記のスケッチは空間上にオブジェクトを生成しないため、実行時に何も表示しません。
setup()関数において、MyAgentインスタンスが2つのベクトル(位置と方向)によって生成されます。
MyAgentクラスのupdate()メソッドにおいて、エージェントの方向を示すベクトル変数 dirがエージェントの位置を示す点posに加算されます。 ここで、posとdirに参照されている IVecインスタンスが外部(親エージェント) からも参照されている可能性があるため、その計算結果を新しい IVecオブジェクトとして生成し、pos2とします。同様に、dirを新しいインスタンスとしてコピーし、 dir2とします。これらの新しいIVecインスタンスを用いて、new MyAgent(pos2,dir.cp()); によって新しいエージェントを生成します。その後、del()メソッドによって元々のエージェントを空間から削除します。
以下のコードは各エージェントの位置に点を生成します。 なおIG.duration()メソッドによって、エージェント50回は更新を行うと停止します。
![]()
![]()
![]()
![]()
import processing.opengl.*;
import igeo.*;

void setup(){
  size(480, 360, IG.GL);
  IG.duration(50);
  MyAgent agent = new MyAgent(IG.v(0,0,0), IG.v(1,0,0));
}

class MyAgent extends IAgent{
  IVec pos, dir;

  MyAgent(IVec p, IVec d){
    pos = p;
    dir = d;
  }

  void update(){
    IVec pos2 = pos.cp(dir);
    IVec dir2 = dir.cp();
    new IPoint(pos);
    new MyAgent(pos2,dir2);
    del();
  }
}
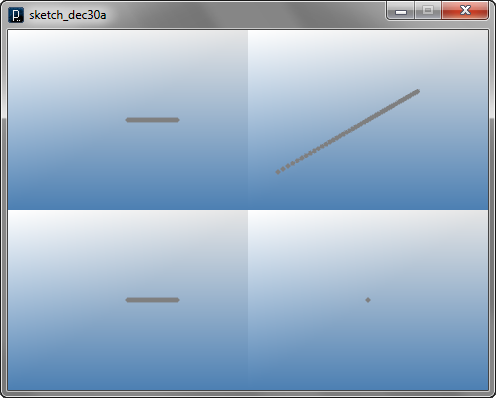
上記コードにおいてエージェントの移動方向は(1, 0, 0)あるため、 X軸上を直線的に移動します。変数dirの値を変更する処理が無いため、エージェントの進行方向は常に変わりません。
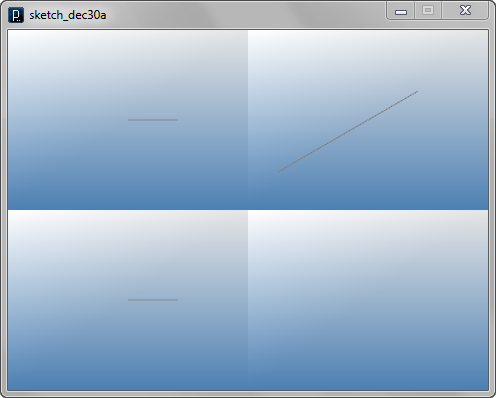
以下のコードは各エージェントから次のエージェントの位置に線を生成します。
![]()
![]()
![]()
![]()
import processing.opengl.*;
import igeo.*;

void setup(){
  size(480, 360, IG.GL);
  IG.duration(50);
  MyAgent agent = new MyAgent(IG.v(0,0,0), IG.v(1,0,0));
}

class MyAgent extends IAgent{
  IVec pos, dir;

  MyAgent(IVec p, IVec d){
    pos = p;
    dir = d;
  }

  void update(){
    IVec pos2 = pos.cp(dir);
    IVec dir2 = dir.cp();
    new ICurve(pos,pos2);
    new MyAgent(pos2,dir2);
    del();
  }
}
方向の変更その1![]()
![]()
![]()
![]()
import processing.opengl.*;
import igeo.*;

void setup(){
  size(480, 360, IG.GL);
  IG.duration(50);
  MyAgent agent = new MyAgent(IG.v(0,0,0), IG.v(1,0,0));
}

class MyAgent extends IAgent{
  IVec pos, dir;

  MyAgent(IVec p, IVec d){
    pos = p;
    dir = d;
  }

  void update(){
    IVec pos2 = pos.cp(dir);
    IVec dir2 = dir.cp();
    dir2.add(0,0.1,0);
    new ICurve(pos,pos2).clr(0);
    new MyAgent(pos2,dir2);
    del();
  }
}
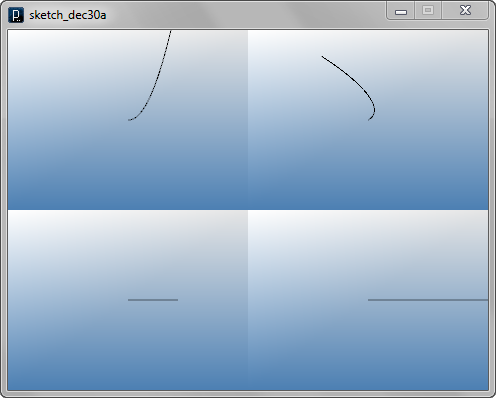
以下の例では、更にX値を徐々に減少させることで、曲線にX軸に沿った傾きを加えます。
![]()
![]()
![]()
![]()
import processing.opengl.*;
import igeo.*;

void setup(){
  size(480, 360, IG.GL);
  IG.duration(50);
  MyAgent agent = new MyAgent(IG.v(0,0,0), IG.v(1,0,0));
}

class MyAgent extends IAgent{
  IVec pos, dir;

  MyAgent(IVec p, IVec d){
    pos = p;
    dir = d;
  }

  void update(){
    IVec pos2 = pos.cp(dir);
    IVec dir2 = dir.cp();
    dir2.add(-0.1,0.1,0);
    new ICurve(pos,pos2).clr(0);
    new MyAgent(pos2,dir2);
    del();
  }
}

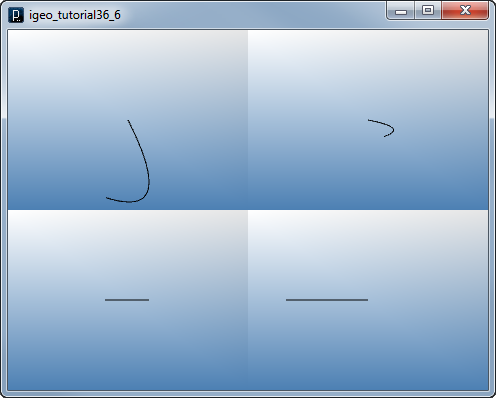
以下のスケッチでは方向の初期値を (1, 0, 0) から (2, -4, 0) に変更することで曲線を変形させます。 このようにエージェントの挙動は初期状態の影響を大きく受けます。
![]()
![]()
![]()
![]()
import processing.opengl.*;
import igeo.*;

void setup(){
  size(480, 360, IG.GL);
  IG.duration(50);
  MyAgent agent = new MyAgent(IG.v(0,0,0), IG.v(2,-4,0));
}

class MyAgent extends IAgent{
  IVec pos, dir;

  MyAgent(IVec p, IVec d){
    pos = p;
    dir = d;
  }

  void update(){
    IVec pos2 = pos.cp(dir);
    IVec dir2 = dir.cp();
    dir2.add(-0.1,0.1,0);
    new ICurve(pos,pos2).clr(0);
    new MyAgent(pos2,dir2);
    del();
  }
}
方向の変更その2![]()
![]()
![]()
![]()
import processing.opengl.*;
import igeo.*;

void setup(){
  size(480, 360, IG.GL);
  IG.duration(200);
  MyAgent agent = new MyAgent(IG.v(0,0,0), IG.v(1,0,0));
}

class MyAgent extends IAgent{
  IVec pos, dir;

  MyAgent(IVec p, IVec d){
    pos = p;
    dir = d;
  }

  void update(){
    IVec pos2 = pos.cp(dir);
    IVec dir2 = dir.cp();
    dir2.rot(IG.zaxis, PI/100);
    new ICurve(pos,pos2).clr(0);
    new MyAgent(pos2,dir2);
    del();
  }
}

以下のコードでは上記の方向ベクトルを徐々に縮小することで渦巻き模様を描写します。
![]()
![]()
![]()
![]()
import processing.opengl.*;
import igeo.*;

void setup(){
  size(480, 360, IG.GL);
  IG.duration(1000);
  MyAgent agent = new MyAgent(IG.v(0,0,0), IG.v(1,0,0));
}

class MyAgent extends IAgent{
  IVec pos, dir;

  MyAgent(IVec p, IVec d){
    pos = p;
    dir = d;
  }

  void update(){
    IVec pos2 = pos.cp(dir);
    IVec dir2 = dir.cp();
    dir2.rot(IG.zaxis, PI/100);
    dir2.mul(0.999);
    new ICurve(pos,pos2).clr(0);
    new MyAgent(pos2,dir2);
    del();
  }
}

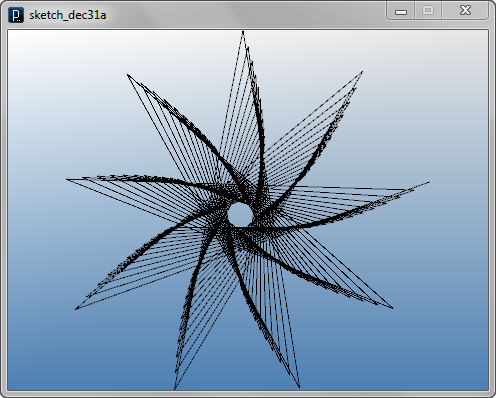
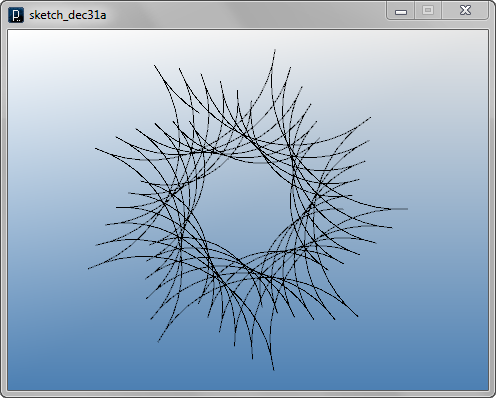
次のコードでは上記の方向ベクトルの回転角度と拡大・縮小率を変更します。 ベクトルが大きく設定されたため、上記スケッチとは見た目の大きく異なった形状が形成されています。
![]()
![]()
![]()
![]()
import processing.opengl.*;
import igeo.*;

void setup(){
  size(480, 360, IG.GL);
  IG.duration(100);
  MyAgent agent = new MyAgent(IG.v(0,0,0), IG.v(100,0,0));
}

class MyAgent extends IAgent{
  IVec pos, dir;

  MyAgent(IVec p, IVec d){
    pos = p;
    dir = d;
  }

  void update(){
    IVec pos2 = pos.cp(dir);
    IVec dir2 = dir.cp();
    dir2.rot(IG.zaxis, PI*0.89);
    dir2.mul(1.01);
    new ICurve(pos,pos2).clr(0);
    new MyAgent(pos2,dir2);
    del();
  }
}
条件分岐を用いた方向の変更その1以下のコードでは方向ベクトルのX値によって回転角度と拡大・縮小率を調整します。
![]()
![]()
![]()
![]()
import processing.opengl.*;
import igeo.*;

void setup(){
  size(480, 360, IG.GL);
  IG.duration(500);
  MyAgent agent = new MyAgent(IG.v(0,0,0), IG.v(1,0,0));
}

class MyAgent extends IAgent{
  IVec pos, dir;

  MyAgent(IVec p, IVec d){
    pos = p;
    dir = d;
  }

  void update(){
    IVec pos2 = pos.cp(dir);
    IVec dir2 = dir.cp();
    if(dir2.x() > 0){
      dir2.rot(IG.zaxis, PI/80);
      dir2.mul(0.999);
    }
    else{
      dir2.rot(IG.zaxis, PI/40);
      dir2.mul(1.01);
    }
    new ICurve(pos,pos2).clr(0);
    new MyAgent(pos2,dir2);
    del();
  }
}

以下の例では方向ベクトルのX値とY値の正負によって4通りの条件分岐を設け、 それぞれの場合において方向ベクトルに異なる変更を加えます。
![]()
![]()
![]()
![]()
import processing.opengl.*;
import igeo.*;

void setup(){
  size(480, 360, IG.GL);
  IG.duration(100);
  MyAgent agent = new MyAgent(IG.v(0,0,0), IG.v(1,0,0));
}

class MyAgent extends IAgent{
  IVec pos, dir;

  MyAgent(IVec p, IVec d){
    pos = p;
    dir = d;
  }

  void update(){
    IVec pos2 = pos.cp(dir);
    IVec dir2 = dir.cp();
    if(dir2.x() > 0 ){
      dir2.set( 0, dir2.x(), 0);
    }
    else if(dir2.y() > 0){
      dir2.set( -dir2.y()-1, 0, 0);
    }
    else if(dir2.x() < 0){
      dir2.set( 0, dir2.x(), 0);
    }
    else if(dir2.y() < 0){
      dir2.set( -dir2.y()+1, 0, 0);
    }
    new ICurve(pos,pos2).clr(0);
    new MyAgent(pos2,dir2);
    del();
  }
}
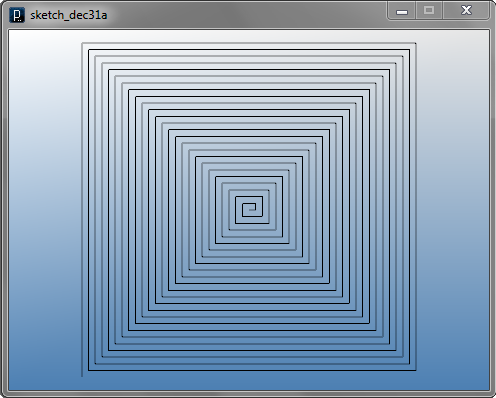
以下のコードではエージェントの位置posのX値によって処理を分岐します。 位置のX値が負のときに方向ベクトルのX値に正の修正を、正のときは負の修正を加えることで、エージェントはX軸に対してジグザグな動きを取ります。
![]()
![]()
![]()
![]()
import processing.opengl.*;
import igeo.*;

void setup(){
  size(480, 360, IG.GL);
  IG.duration(500);
  MyAgent agent = new MyAgent(IG.v(0,0,0), IG.v(2,1,0));
}

class MyAgent extends IAgent{
  IVec pos, dir;

  MyAgent(IVec p, IVec d){
    pos = p;
    dir = d;
  }

  void update(){
    IVec pos2 = pos.cp(dir);
    IVec dir2 = dir.cp();
    if(pos2.x() > 0){
      dir2.add(-0.1, 0, 0);
    }
    else{
      dir2.add(0.1, 0, 0);
    }
    new ICurve(pos,pos2).clr(0);
    new MyAgent(pos2,dir2);
    del();
  }
}
条件分岐を用いた方向の変更その2以下のスケッチでは経過時間によって三通りの条件分岐を設け、 それぞれの場合においてエージェントの方向ベクトルに異なる変更を加えます。 以下のようにIG.time()とif, else if, elseを組み合わせて条件分岐をします。
if( IG.time() < 100 ){ ... }
else if( IG.time() < 200 ){ ... }
else{ ... }
![]()
![]()
![]()
![]()
import processing.opengl.*;
import igeo.*;

void setup(){
  size(480, 360, IG.GL);
  IG.duration(250);
  MyAgent agent = new MyAgent(IG.v(0,0,0), IG.v(0,2,0));
}

class MyAgent extends IAgent{
  IVec pos, dir;

  MyAgent(IVec p, IVec d){
    pos = p;
    dir = d;
  }

  void update(){
    IVec pos2 = pos.cp(dir);
    IVec dir2 = dir.cp();
    if(IG.time() < 100){
      dir2.rot(IG.zaxis, PI/30);
      dir2.mul(0.99);
    }
    else if(IG.time() < 200){
      dir2.rot(IG.zaxis, -PI/15);
      dir2.mul(1.01);
    }
    else{
      dir2.add(0, -0.05, 0);
    }
    new ICurve(pos,pos2).clr(0);
    new MyAgent(pos2,dir2);
    del();
  }
}
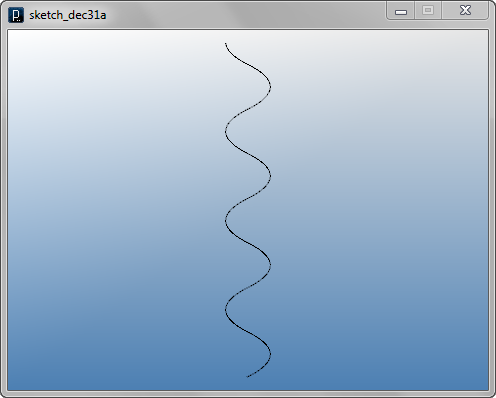
以下の例では、余剰演算子 % を経過時間に適用し、 その計算結果によって条件分岐を設けることで、エージェントに周期的な挙動を実装します。
if( IG.time() % 15 == 0){ ... }
else{ ... }
![]()
![]()
![]()
![]()
import processing.opengl.*;
import igeo.*;

void setup(){
  size(480, 360, IG.GL);
  IG.duration(800);
  MyAgent agent = new MyAgent(IG.v(0,0,0), IG.v(1,0,0));
}

class MyAgent extends IAgent{
  IVec pos, dir;

  MyAgent(IVec p, IVec d){
    pos = p;
    dir = d;
  }

  void update(){
    IVec pos2 = pos.cp(dir);
    IVec dir2 = dir.cp();
    if(IG.time()%15==0){
      dir2.flip();
      dir2.mul(1.01);
    }
    else{
      dir2.rot(IG.zaxis, PI/25);
    }
    new ICurve(pos,pos2).clr(0);
    new MyAgent(pos2,dir2);
    del();
  }
}
次のコードでは、経過時間と余剰による条件分岐を増やすことで、更に複雑な形状を形成します。
条件式には == に限らず < などの比較演算子を用いることもできます。
if( IG.time()%50 < 10 ){ ... }
else if( IG.time()%50 == 10 ){ ... }
else if( IG.time()%50 < 30 ){ ... }
else if( IG.time()%50 < 40 ){ ... }
else if( IG.time()%50 == 40 ){ ... }
else{ ... }
![]()
![]()
![]()
![]()
import processing.opengl.*;
import igeo.*;

void setup(){
  size(480, 360, IG.GL);
  IG.duration(800);
  MyAgent agent = new MyAgent(IG.v(0,0,0), IG.v(1,0,0));
}

class MyAgent extends IAgent{
  IVec pos, dir;

  MyAgent(IVec p, IVec d){
    pos = p;
    dir = d;
  }

  void update(){
    IVec pos2 = pos.cp(dir);
    IVec dir2 = dir.cp();
    if(IG.time()%50 < 10){
      dir2.rot(IG.zaxis, PI/20);
    }
    else if(IG.time()%50 == 10){
      dir2.flip();
    }
    else if(IG.time()%50 < 30){
      dir2.rot(IG.zaxis, PI/11);
    }
    else if(IG.time()%50 < 40){
      dir2.rot(IG.zaxis, -PI/21);
    }
    else if(IG.time()%50 == 40){
      dir2.flip();
    }
    else{
      dir2.rot(IG.zaxis, PI/15);
      dir2.mul(1.01);
    }
    new ICurve(pos,pos2).clr(0);
    new MyAgent(pos2,dir2);
    del();
  }
}
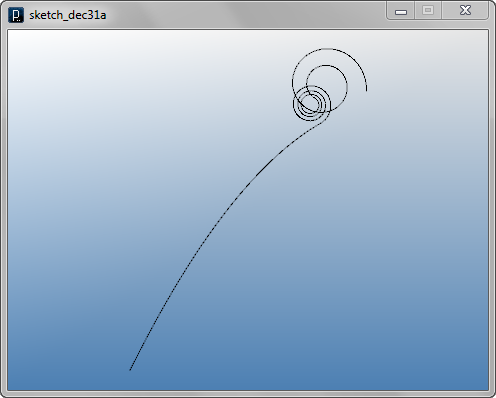
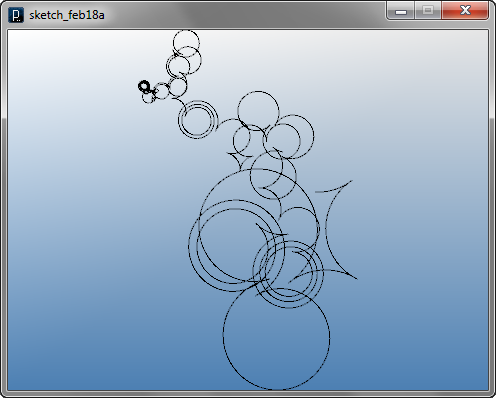
乱数を用いた方向の変更以下のコードでは、方向ベクトルをIRand.get(-PI*0.4,PI*0.5)によって回転させることで、エージェントにランダム歩行を実装します。 IRand.get(-PI*0.4,PI*0.5)が出力するランダム値の平均は正に偏ることに注意してください。そのため、このエージェントは正の向きに回転する傾向があります。
![]()
![]()
![]()
![]()
import processing.opengl.*;
import igeo.*;

void setup(){
  size(480, 360, IG.GL);
  IG.duration(1000);
  MyAgent agent = new MyAgent(IG.v(0,0,0), IG.v(0,2,0));
}

class MyAgent extends IAgent{
  IVec pos, dir;

  MyAgent(IVec p, IVec d){
    pos = p;
    dir = d;
  }

  void update(){
    IVec pos2 = pos.cp(dir);
    IVec dir2 = dir.cp();
    dir2.rot(IG.zaxis, IRand.get(-PI*0.4, PI*0.5)); //-72deg to +90deg
    new ICurve(pos,pos2).clr(0);
    new MyAgent(pos2,dir2);
    del();
  }
}
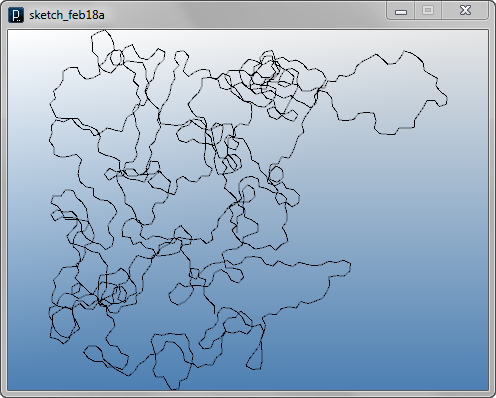
以下のスケッチは、「条件分岐を用いた方向の変更その2」のコードにおける分岐条件を、
経過時間の余剰からランダム値に置換したものです。
IRand.pct()メソッドは引数%の確率で真(true)を返します。たとえば、コード中IRand.pct(2.5)は2.5%の確率で真となります。
このメソッドを用いることで、エージェントの挙動に簡単にランダム性を持たせることができます。
if( IRand.pct(2.5) ){ ... }
//2.5% probability
else{ ... }
//97.5% probability
![]()
![]()
![]()
![]()
import processing.opengl.*;
import igeo.*;

void setup(){
  size(480, 360, IG.GL);
  IG.duration(2000);
  MyAgent agent = new MyAgent(IG.v(0,0,0), IG.v(1,0,0));
}

class MyAgent extends IAgent{
  IVec pos, dir;

  MyAgent(IVec p, IVec d){
    pos = p;
    dir = d;
  }

  void update(){
    IVec pos2 = pos.cp(dir);
    IVec dir2 = dir.cp();
    if(IRand.pct(2.5)){ //2.5% probability
      dir2.flip();
      dir2.mul(1.1);
    }
    else{ //97.5% probability
      dir2.mul(0.996);
      dir2.rot(IG.zaxis, PI/25);
    }
    new ICurve(pos,pos2).clr(0);
    new MyAgent(pos2,dir2);
    del();
  }
}
複数エージェントの初期化![]()
![]()
![]()
![]()
import processing.opengl.*;
import igeo.*;

void setup(){
  size(480, 360, IG.GL);
  IG.duration(80);
  for(int i=0; i < 40; i++){
    new MyAgent(IG.v(i*5,0,0), IG.v(1-0.05*i,-0.1*i,0));
  }
}

class MyAgent extends IAgent{
  IVec pos, dir;

  MyAgent(IVec p, IVec d){
    pos = p;
    dir = d;
  }

  void update(){
    IVec pos2 = pos.cp(dir);
    IVec dir2 = dir.cp();
    dir2.add(0,0.1,0);
    new ICurve(pos,pos2).clr(0);
    new MyAgent(pos2,dir2);
    del();
  }
}

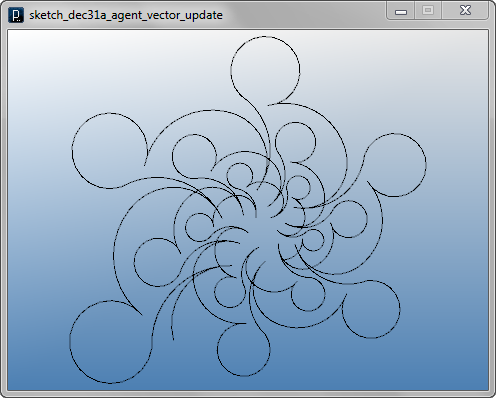
以下のスケッチでは以前の 別のスケッチで用いたエージェント を、異なる位置と方向ベクトルで複数回実行します。
![]()
![]()
![]()
![]()
import processing.opengl.*;
import igeo.*;

void setup(){
  size(480, 360, IG.GL);
  IG.duration(250);
  int num = 40;
  float inc = 2*PI/num;
  for(int i=0; i < num; i++){
    new MyAgent(IG.v(40*cos(i*inc), 40*sin(i*inc), 0),
                IG.v(5*cos((i+6)*inc), sin((i+6)*inc), 0));
  }
}

class MyAgent extends IAgent{
  IVec pos, dir;

  MyAgent(IVec p, IVec d){
    pos = p;
    dir = d;
  }

  void update(){
    IVec pos2 = pos.cp(dir);
    IVec dir2 = dir.cp();
    if(pos2.x() > 0){
      dir2.add(-0.1, 0, 0);
    }
    else{
      dir2.add(0.1, 0, 0);
    }
    new ICurve(pos,pos2).clr(0);
    new MyAgent(pos2,dir2);
    del();
  }
}

HOME
FOR PROCESSING
DOWNLOAD
DOCUMENTS
TUTORIALS (Java /
Python)
GALLERY
SOURCE CODE(GitHub)
PRIVACY POLICY
ABOUT/CONTACT
